Monday, July 16, 2012

Swiss Chard Tzatziki

Our swiss chard has taken off in the garden.  While Thomas weeded yesterday he picked up the pieces he broke off while weeding.  This gave me a large quantity of chard to deal with in a timely manner.  This is one of the recipes I made, Thomas was skeptical, but it turned out amazing, a bit like a spinach dip, only not.  We ate every last bite.  The only variation I will explore in the future is to make more of it at a time.  It was so good in fact, I forgot to take a picture before we were done eating.  SO this is the remnants of the final bites.

Recipe from Martha Stewart

Swiss Chard Tzatziki

Serves 4
Makes About 1 1/4 Cups

Ingredients
1 cup green or red Swiss chard, stemmed and finely chopped
1 garlic clove
1/4 teaspoon coarse salt
1 cup low-fat Greek yogurt
1 tablespoon extra-virgin olive oil
1 tablespoon fresh lemon juice
1/8 teaspoon cayenne pepper

Directions
Prepare an ice bath; set aside. Bring a large saucepan of water to a boil. Add chard; cook until just tender, 3 to 5 minutes. Drain. Immediately plunge into ice bath to stop the cooking. Drain.
Using a mortar and pestle, grind garlic and salt into a paste. Stir chard, yogurt, garlic paste, oil, lemon juice, and cayenne pepper in a medium bowl. Serve with pita wedges, bread or crackers. Tzatziki can be refrigerated in an airtight container up to 1 week.

Wednesday, July 4, 2012

Flock of the Month

A few months ago we learned about the web site, www.Eggzy.net through a great magazine we love reading, GRIT.   It is a site that allows you to track your chicken eggs and who lays them and allows people to see your egg stand and message you for eggs if they wish.  We figured why not?  Give us a way to keep track and allow our friends to see online if we have any eggs available or not.

Last week they emailed me, asking if we would be interested in doing an interview with them and being the featured flock of the month on their blog!  I of course said, NO, just kidding, I of course was super excited and said, YES! 

Here we are this week, we've gone through the interview and now the feature is up!  We're so amazed and proud!  Plus its funny to be called a modern homesteader, when just a couple months ago, I came to the realization that we are modern homesteaders and that we are foodies (but that's another story entirely).

Please visit their feature of us and be impressed by how awesome we sound through a strangers eyes :)  This may or may not also lead you to our Flickr feed, if it doesn't you should check it out, see more photos of our ladies!

Tuesday, July 3, 2012

Make Your own Dishwasher Detergent

Ingredients for making your own dishwasher detergent, along with the finished product in the ball jar.
Making our own dishwasher detergent is something I had wanted to start doing for quite some time.  We stopped using "conventional" detergents probably 5 years ago.  They contain a huge number of things I don't want in my home: phthalates, chemicals, animal fats (which are in all name brand non-organic detergents) that stick to the septic tank and can't be removed, oh so too many to name.

Any who, once we made this decision years ago, we embarked on trying every "green" organic dishwasher detergent there is, because let's face it, if you make as much food from scratch as I do, you make A LOT of dishes.  When I say a lot, you are probably imagining your sink and thinking, yeah I'm sure I have more than her sometimes, but no.  Imagine you're biggest dish pile and then probably times it by five and then maybe that is how many dishes I make on a daily basis.  That's right, its not pretty.

So after years of using CitraSolv which totally works awesome, way better than all other organics, but costs $8 a pop if it's not on sale, I decided to finally explore making our own and try to save some money!

After deciding this I researched a few recipes, mostly on Mother Earth News (if you do not subscribe to this magazine, you must, it is the best cover to cover reading ever and I love love love love love it and strongly believe whether you are a organic market freak like me or not, you will love it too for its free thinking important environment fact providing articles every month).  There are recipes for liquid and powder detergents, I'm used to powder ones and for some reason just seems smarter, like it will hold better in my cupboard, plus I think its more cost effective as castille soap is one of the main ingredients in the liquid versions, which is a bit pricey for how much you need and how far it goes.  (I think, don't quote me on this, as I have not officially done the math).

I have since made quite a few of this and come to a somewhat happy conclusion with the recipe.  I still feel there is a bit more film than I am 100% happy with, however, it is easy enough to wipe off when pulling out of the dishwasher while I decide how to further refine my recipe (which I will discuss in the recipe below).

So here's the recipe:
  • 2 c. borax
  • 2 c. baking soda
  • ½ c. of citric acid
  • 36 drops grapefruit essential oil
Mix together in a big bowl trying not to breath in citric acid when you do it, because it burns your nostrils and throat, trust me, and let dry (for a few hours, but not if its humid and keep stirring occasionally), then store in a container that will keep it dry (I use a big ball jar).  They say you can substitute 4 lemon Kool-Aid packets for the citric acid but I have not tested this and do not know how it works.  To use just put it in the dishwasher receptacle same as any other powder detergent.

Now, onto the details of how it works and the things I've learned.  Firstly, do not leave out the citric acid powder and do not skimp on it.  There are many recipes out there that do not have this ingredient included.  I tried many of them and they all left massive film.  Even with this 1/2 cup I feel there is still a bit too much film.  This is when I experimented with putting vinegar in the rinse aid.  This seems to help greatly.  I still feel there is more film that with my old CitraSolv though, so I will probably be adding more citric acid to the next batch and see how it fares.

The grapefruit essential oil is just to make it smell pretty really.  You could use basically any essential oil you wanted, the cost of them varies greatly depending on the scent you choose, which is based on how difficult is it to extract the oil and how much do you get per whatever it is you're extracting.  Grapefruit and other citrus are some of the easiest and generally cost the least out of the choices.  We buy ours at Oryana, but many natural stores and online stores should have it available.

Citric acid may seem like a weird ingredient to find and you would be right.  We originally were buying it from Oryana in the bulk tea section.  It was the most expensive of all the ingredients at $8.99 a pound, but because you didn't need much, it still added up to less than our premixed CitraSolv.  Then a couple months ago when I needed to remake a batch, they were sold out, not for a day or two, but like a month and a half.  I asked why and when they would get more in, they informed me that the "great" Dr. Oz said it helped your pH or something if you ate it and so it was sold out nationwide for an unknown amount of time because suppliers couldn't keep up.  This blew my mind, that one celebrity can cause a nationwide shortage.  AMAZING.

Anyway, this lead to locating another source.  We happened to be looking through one of our beer brewing catalogs and discovered that it is sold in massive quantities for cleaning beer equipment at  HALF the cost that it is from Oryana.  So we have now switched to purchasing it in major bulk online from Midwest Supplies, where we get all our beer brewing stuff (they're awesome, perhaps I can write more on them later).  The link to that is here, http://www.midwestsupplies.com/citric-acid-1-lb.html if you are interested in getting your own supply.

For purchasing Borax and Washing Soda, I was at a loss, all recipes I looked at said that it was available everywhere, but I had never remembered seeing it anywhere.  So I headed to Meijer and went on a search, it took some doing, since no one seemed to know what I was talking about, and I barely did myself, but I eventually found it.  Not with dishwasher stuff, not with laundry stuff, its with the like silver polishing and weird cleaners section, on the bottom bottom shelf, both sitting right next to each other.  I couldn't believe how cheap both were, especially cause they are pretty good sized boxes and you don't need it all for a batch, it makes about 3-4 batches per box.

So that's it, go forth and test.  If I have forgotten something, just message me and I will answer.  As I said, I will keep tweaking with mine and if I get any new successes I will be sure to pass it along!


UPDATE 1/31/13 - Since writing this blog originally, we have started adding 1 cup of coarse salt to our mix.  This seems to improve the hazy residue from occurring as badly.  We have also started running every 10th load with a heavy dose of vinegar just shot in the base of the dishwasher to cut down on some of the buildup of calcium and iron that we get here with our well water.


Wednesday, June 13, 2012

Farmer's Market Food

Celeriac & Apple Slaw, Beet Salad, Chicken Nuggets & Apricot Mustard Sauce
Two weeks ago we enjoyed eating from our bounty from the market.  A large variety of foods have been explored, all with things in season and on stock here at our home.  (Though I do tend to try and stock things I know I might want - we have two chest freezers and two fridge freezers and two pantries - AND I want another chest freezer this summer).

I haven't included every single thing we've made, but have tried to include things that were made using market ingredients.  As follows: Lots of asparagus puree for Arya; Beet Salad with feta and pecans; Celeriac and Apple Slaw, Chicken Nuggets and Apricot Mustard Sauce; Chicken Stocks; Salad with Pan Fried Chicken breast, Fresh croutons, Hardboiled eggs, Balsamic vinaigrette and fennel, German Style Potato Salad, Lemon Sausage with Potato Salad, Fried Tomatoes and Eggs fried in leftover tomato juice from pan; Pesto Tomato Frittata with bacon; finger radishes; cooked radish with spinach greens; roasted radishes and ramps; Coq au vin; Lemon sausage, steamed asparagus, poached eggs and hollandaise sauce; spring green soup with tomato cheese sandwiches; Spicy Lime and Cilantro Shrimp with millet and a vegetable but sadly I already forgot what it was, though it was from the market.

All of these things turned out awesome a few I would make some slight alterations to, but overall success all around.  If the ingredients weren't from the market, they were organic from Oryana or from our freezers or fridge.  The chickens were our chickens we raised.  Any eggs are from our chickens.  I feel the quality and integrity and nutrients of our ingredients make a huge difference in the flavor.  If you are inspired to try any of these dishes I suggest you try to get similar wholesome ingredients for tasty delicious in your kitchen! 

Most of my recipes are either from experience of making it a lot or adapted from Martha Stewart, because I love her recipes.  If it is from any of my other numerous cook books, I will let you know!

First off, chicken nuggets made from the chicken breast of our own chickens that we slaughtered.  These were the Rainbow Ranger broilers.  They are tasty.

Chicken Nuggets
Ingredients
Nonstick cooking spray
1/2 cup all-purpose flour
Coarse salt and freshly ground pepper
2 large eggs
1 1/2 cups panko breadcrumbs
2 tablespoons extra-virgin olive oil
1/2 cup freshly grated Parmesan cheese
Pinch of cayenne pepper
4 large boneless, skinless chicken breast halves (about 2 pounds), cut into 1-inch cubes
1 cup apricot jam or preserves
1/4 cup Dijon mustard
1 teaspoon chopped fresh thyme leaves
Directions
Preheat oven to 375 degrees. Line a baking sheet with parchment paper and fit with a wire rack. Spray with cooking spray; set aside.
Place flour in a large bowl and season very generously with salt and pepper. Whisk eggs in another large bowl with 2 tablespoons water until well combined. Place the breadcrumbs in a third large bowl, and drizzle with olive oil; toss to coat. Stir in cheese and cayenne and mix well.
Place chicken pieces in the seasoned flour and toss to coat. Working in 3 batches, shake off any excess flour from chicken pieces and transfer to egg mixture; stir to combine. Transfer coated chicken pieces with a slotted spoon to the breadcrumb mixture and toss until completely coated. Place the breaded chicken pieces on a rack-lined baking sheet, spacing them evenly apart. Repeat process until all the chicken is breaded. Bake until golden brown and chicken is cooked through, 18 to 20 minutes.
In a small bowl, stir the apricot jam, mustard, and thyme together until combined. Allow chicken to cool 10 minutes before serving with apricot mustard mixture.

Next, the beet salad.  I make this every summer once the beets start coming in.  It is so good.  Great combination of beet with feta and then a balance of pecan crunch.  Highly recommend to anyone who loves beets, or is afraid of them, as this does not taste like pickled beets in any way.  Also, I always burn the pecans when toasting - watch them carefully to avoid my mistake.

Beet Salad
Ingredients
1/2 cup pecans
4 bunches small beets (16 to 20 beets)
3 tablespoons cider vinegar
3 tablespoons olive oil
4 ounces feta cheese, crumbled
2 tablespoons freshly chopped flat-leaf parsley, plus sprigs for garnish
Coarse salt and freshly ground pepper
Directions

Preheat oven to 350 degrees. Place pecans on a baking sheet, and toast until fragrant, about 10 minutes. Transfer to a bowl to cool. Coarsely chop, and set aside. Raise oven temperature to 450 degrees.
Trim greens and long roots from beets. Wrap in 2 to 3 aluminum-foil packets, dividing beets according to size. Place in oven, and roast until tender, 45 to 60 minutes, depending on size of beets. Using paper towels to protect your hands, wipe the skins from the beets. Cut into wedges, and transfer to a serving bowl.
Drizzle vinegar and olive oil over beets; toss to coat (beets can be made ahead). When ready to serve, add feta, parsley, pecans, and salt and pepper to taste; toss to combine. Garnish with parsley sprigs.

Finally, the Celeriac and Apple Slaw.  In the future I will shred the ingredients.  The recipe called for matchsticks, so that is what I did.  However, we decided it would absorb more flavor and be softened more if it were shredded, PLUS it would be easier to eat.  If you have never tried celeriac, I strongly suggest it.  It is a fun vegetable, it tastes a lot like celery, but has the texture of parsnips.  If you have never ever had it before, this is not the recipe I would recommend first.  It is not that this doesn't taste good, it does, but it is not the best way I have EVER had celeriac (that is in a blue cheese celeriac soup, which perhaps someday I can post the recipe for).

Celeriac and Apple Slaw
Ingredients 
1 small celery root (about 12 ounces), trimmed, peeled, and cut into matchsticks (2 cups) 
1 Granny Smith apple, cut into matchsticks (2 cups)
1/4 cup plus 1 tablespoon fresh cider
2 teaspoons sugar
2 teaspoons Dijon mustard
2 teaspoons chopped fresh flat-leaf parsley
Directions  
Combine all ingredients in a bowl, and toss. Let stand for 30 minutes before serving.

Chicken stock ready to start
Now onto the next thing, chicken stock!  It is something we often make here at our home.  It is a very nice way to get more money out of what you've purchased already.  In our case its our own chickens, either the carcasses or tough rooster chickens.

Throw them into a big pot, fill with water close to top, but not to the very top or it will boil over.  Add one onion quartered with skin removed, one carrot ends cut off and cut into about 2 inch pieces, one stalk of celery ends cut of cut into 2 inch pieces, a bunch of parsley (at least 4 sprigs), about 10 peppercorns (we always use white pepper as we like the flavor better and some of our friends are allergic to black pepper, using white ALWAYS, means I don't have to remember what to use or not use when they are over, which is often), any other herbs you want to throw in for flavor (thyme, sage, oregano, etc), you can also throw in a garlic or a leek, but I generally don't because I consider these more "precious" veggies that I don't want to "waste" in my stock.

Boil until the chicken is completely broken down to nothing and the liquid is literally now cloudy with chicken goodness, will take many hours, start out at a boil and once there reduce to medium and keep around there for the remainder of the time, you will have to keep adding water throughout this process.  Let cool and ladle off the top layer of stock and put in a skinnier tall container, this will allow you to much more easily separate out the fat.  You can save the fat if you want to cook with chicken fat in the future.  It's delicious and I suggest it.  Apparently iron chef, Michael Symon, has talked about how much he loves doing this on that new primetime talk show my mom is always talking about (I have never watched it, but I totally agree with him).

Chicken stock ready to cool
The stock can then be strained into containers to be frozen.  I suggest using quart containers, since that is the size you generally purchase at the store.  One pot usually makes at least 5 quarts of stock.  As far as organic stock goes, this is a score, because it is expensive at the store.  You can reuse that chicken carcass from your rotisserie chicken and get more money from it by making stock for another time!

If you let the chicken stock cool, before you put it into containers, it will become a gelantenous gel.  Do not be afraid, be happy.  This means all the wonderful healthful benefits are now in your stock and will go into your body!

Then if the chickens had any meat left, go through picking it out and put it in a ziploc bag and freeze it.  Now you have shredded chicken ready for making curries or bbq sandwiches or salads or whatever else you want it for.  We do this often.  Give you leftover scraps to your chickens or the compost pile.  Zero waste.

Salad with fried chicken, egg, croutons, fennel and balsamic dressing
Now onto the next photo here: The salad.  Thomas actually put this one together for us.  Salad mix from market, delicious tender baby lettuces.  He hard-boiled two of our eggs, peeled and put them on.  Croutons were our typical style, cut up, throw in bowl, drizzle with olive oil, salt, pepper and Parmesan cheese, stir and mix up.  Put on a cookie sheet and put in oven at 350-400 for 5-20 minutes depending on temperature and the size you cut the bread.  We used our popcorn elephant ear bread from Patisserie Amie this time, which made them extra buttery too.  Croutons are better the slower they cook, but sometimes you want salad faster and have no time to wait.  This will hold for a few days, but not forever like a gross bag from the store will, as there are no preservatives (so nothing to preserve your insides, hooray!)  He chopped some of the fennel bulb for the salad and put it on.  He pan fried the chicken with some light olive oil in the pan and a think he threw in a few herbs we had dried in the pantry from last summer, probably thyme and basil.  Then we topped it off with my balsamic dressing.  Recipe is as follows:

Balsamic Dressing
Makes 1 1/3 cups
Ingredients
2 small garlic cloves, pressed through a garlic press or food processed
2 teaspoons sugar
2 teaspoons dried mustard
Coarse salt and freshly ground pepper
1/2 teaspoon crushed red pepper flakes
1/4 cup balsamic vinegar
2 tablespoons white wine vinegar
1/2 cup extra-virgin olive oil
1/2 cup canola oil
1/4 cup finely chopped fresh basil
2 teaspoons finely chopped fresh marjoram
1 teaspoon finely chopped fresh oregano

Directions  

Whisk garlic, sugar, mustard, 1 1/2 teaspoons salt, 1/2 teaspoon pepper, the red pepper flakes, and vinegar in a medium bowl. Whisk together oils; add to vinegar mixture in a slow, steady stream, whisking until emulsified. Whisk in herbs; season with salt and pepper. Refrigerate in an airtight container up to 1 week. (it totally lasts longer than this though, because vinegar has a real real hard time going bad)

Tomato Pesto Frittata and Bacon

Next photo is the Tomato Pesto Frittata and Bacon.  You can see my other post for the recipe and details on this tasty tidbit.  For the bacon I used local Gallagher's thick slice bacon, cooked low and slow, so it gets super crispy and delicious.  I save the bacon fat and refrigerate it for many other cooking uses.

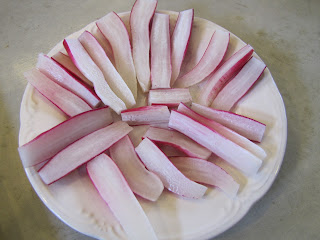
French Breakfast Radishes ready to eat as finger food with lunch

Here we see the radishes cut into fingers.  We ate this for lunch one day with sandwiches or something.  I already can't remember what else we had with them.
Radish greens from lunch waiting in water for dinner

Baked Radishes, Spinach & Radish greens, Coq au Vin
Asparagus, poached eggs, hollandaise sauce & lemon sausages
The radish greens from the radishes, soaked in a water bath until it was dinner time.  This kept them from wilting, since they were now no longer attached to the radishes.

Next is where the radish greens went.  Radish greens and spinach.  Skillet heated with olive oil and chicken stock, greens added.  Pinch of red pepper flakes, salt and pepper to taste.  Cooked until wilted down.

Coq au vin, this was actually out of the freezer.  Made a huge batch of it some time ago and portioned it out in the freezer for days with less time, but big hunger.  Perhaps I will be able to get the recipe up here in the future as a separate blog.  It takes many hours to cook, as it uses our tough roosters (that we no longer raise, because they're too tough to deal with, in two senses, personalities and texture).  

Finally, roasted radishes.  If you have never tried roasted radishes, you are SERIOUSLY missing out.  Now, I suggest using fresh ones, not ones from a bag at the store, I have never made them with those, so can't speak for how they taste that way.  But as for the fresh ones, they are delicious, loose most of their bite, but not quite all and are super watery squishy wonders.  I clean them up, chop them into mostly uniform sizes and then toss with olive oil, salt and pepper.  Literally that is it.  This time I also chopped up a few ramp bulbs and tossed them in too.  Put in a preheated 425 oven for at least 35 minutes.  Depending on the size you chop them up as depends on how long you have to cook them, obviously, make sure they are all tender and just starting to get a little brown color on them for a bit of exterior texture!

Oh boy, next onto our delicious asparagus and hollandaise sauce.  People should have a favorite way to eat eggs and it shouldn't be because its the only way they've ever tried them before.  Anyone who knows me with eggs, knows my favorite is eggs Benedict.  If I see it on a menu I am FORCED to order it to see how the restaurant measures up to all others I have had.  I have had eggs Benedict all over the country.  If you have only had hollandaise sauce from a packet, shame on you ;)  It is not so hard to make.  I generally even use a cheater method by using my blender.  Super simple, not sacrificing flavor.

Second, sausage is a delicious breakfast addition.  We have been making sausage for like 5 years now.  Storebought sausage is really not good for you.  It is full of nitrates and other nonsense to make it last longer.  Nitrates are a common cause of headaches.  In addition, storebought sausage lacks depth and deliciousness of flavor.  People who try my sausage often ask how I achieved it, answer, FRESH made.  Finally, premade sausage costs more.  Ground pork sausage, with no spices added, etc.  IS SO CHEAP.  I personally think this is because hardly ANYONE buys it anymore.  I get it from my local butcher shop, Burritts or from two of our different farmer friends, all of which I am obsessed with.  Burritts also gets theirs from a local supplier(s). Try making some and you will not be disappointed.  Start with making patty sausage first, won't be long and you'll want a sausage stuffer.  They are fun, but definitely not necessary for good homemade sausages.

So back to the food.  Asparagus was the base.  For this I trimmed the asparagus and steamed it for about 7 minutes.  Eggs were poached in the asparagus liquid.  I wanted to see if it would turn the eggs green, it did not.  I added a capful of vinegar to the water before poaching, as this helps hold the eggs together better.  If you swirl the water in the saucepan like a flushing toilet before dropping the egg in, the white holds its round shape better.  3 minutes or so in simmering water should be good, but obviously be sure it looks cooked before you pull it out.  Dab the egg (while its still in a slotted spoon you removed it with) on a towel before you plate it, to get some of the excess water off first).

The hollandaise sauce.  I use a cheater method, which means I use a blender.  It still is fresh, still is delicious, almost tastes the same and is about 100 times easier.  It is a recipe from the Joy of Cooking that I have been using since probably 1997.  So I guess I like it.  I again make this with our eggs, which we feel makes a huge difference.  Find some local fresh eggs for this one, since there are so few ingredients, each one is really important!

Hollandaise Sauce

Ingredients
3 large egg yolks
2 tsps fresh lemon juice, or to taste
Ground white pepper or hot red pepper sauce to taste
Salt to taste
1/2 cup very warm to hot clarified butter

Directions
Place the first four ingredients into a blender and process on high speed for one minute.  It should turn a much lighter color yellow.  With the machine running, add in a slow stream the clarified butter.  By the time all the butter is poured in - about one minute - the sauce should be thickened.  If not, process on high speed for about 20 seconds more.  Taste and adjust the seasonings as you see fit.  Serve immediately or keep warm by submerging the blender in warm water.  I always make this at the last second, so its just ready at the time to serve.

Finally, with the final part of that breakfast was the Lemon Sausage.  Right around the time Thomas and I got married, we started dabbling in sausage making when we got the sausage making attachment for my kitchen aid mixer as a wedding present.  Since then we have come a long way.  I have now gotten to the point that I have made enough different kinds of sausages that I am fairly adept at creating my own sausage creations that are more delicious than any store-bought variety, plus no nitrates to give you headaches!

So here follows this sausage creation, as I remember it, it was a new creation and I didn't write it down, so I'll do my best to remember it.  Few tricks I use for making tasty sausage:  always add some form of sugar - this helps it caramelize and brown like you are used to, always add heavy whipping cream - this gives it nice moisture, always add enough salt to bring out all the other flavors, always add finely processed onion - onion is good for you and it tastes delicious, finely processing it, means people won't realize why it tastes so good, just know that it does.

Ingredients
1 pound of ground pork sausage
Zest of one lemon and the lemon juice from that lemon
1/4 cup heavy whipping cream
1 tsp ground mustard
6 sprigs of fresh parsley
1/2 small sweet yellow onion
1 green garlic (these are baby garlics)
2 tsp salt (more to taste if necessary)
1/4 tsp white pepper
1/4 cup maple syrup
Pinch of cayenne pepper
 Directions
Roughly chop the lemon juice, parsley, onion and garlic.  Throw into a food processor and process until fine and juicy.  Mix all ingredients together until well mixed.  Take a small amount of the mixture and fry in a pan.  Taste this bite once cooked and slightly cooled (meaning don't instantly eat it and burn your tongue as I have done a thousand times).  If it tastes delicious, proceed frying the rest of them, if you think it is lacking something, add what you think it needs.  Generally, this may be a bit more salt to help all the flavors really shine!

Spring Green Soup & Tomato & cheese sandwiches on sourdough
 Now onto lunch!  We made tomato and grilled cheese sandwiches with a Spring Green soup.  Turned out rather well.

For the grilled cheese, I used my organic bread that I make myself.  After years of buying expensive organic bread I have finally gotten myself into the habit of making bread every other weekend and freezing two loaves, leaving one out.  As we need them I pull them out of the freezer.  They are delicious and much cheaper than buying organic bread.  In the future I will try to get my favorite and most successful bread recipes up here on the blog.

We then used our local sharp cheddar from an Omish farm that comes to the market.  Quick tip about cheese, if you buy grocery store cheese, ie Kraft, Spartan, etc, most of what you are getting is food grade glue.  This is a product that helps hold together milk that would otherwise be too old or too little in quantity to form as cheese.  The FDA has deemed it safe for consumption despite the fact that it is used as actual glue in other industries.  Food companies are not required to include this in their list of ingredients, due to some fun loopholes and such.  This is why you may notice a stark difference in flavor and stringyness between a cheese from a farmer and a cheese from the store.  Once you get used to real cheese, you CAN taste a difference and it is weird texturally.

Finally, we put in the tomatoes from the market and brushed both sides of the bread with organic butter from oryana.  I like to put a lid on my skillet when making grilled cheese, helps the cheese melt faster.

Now onto the soup.  Wanted to try using some asparagus in a different way.  Had kale from the market too, so it got tossed in as well.  This recipe was modified from Martha Stewart.

Spring Green Soup
Ingredients
1/4 cup extra-virgin olive oil
1 small onion, thinly sliced lengthwise
Pinch of crushed red pepper flakes
Coarse salt
1 pound asparagus, trimmed, chopped, tips reserved
4 cups homemade chicken stock or store-bought low-sodium canned chicken broth
1-2 cup loosely chopped kale leaves
1/3 cup heavy whipping cream.
Directions
In a medium saucepan, heat 2 tablespoons oil over medium-high heat. Add shallot, red pepper flakes, and a pinch of salt. Cook, stirring occasionally, until shallots are tender and just beginning to brown, about 5 minutes.
Add chopped asparagus, and cook for 1 minute. Stir in broth and 1 cup water; bring to a boil. Reduce heat to a simmer; continue cooking until asparagus is tender, about 15 minutes.
Meanwhile, prepare and ice-water bath. Fill a medium saucepot with water and bring to a boil. Add salt, return to a boil, and add asparagus tips. Cook until just tender. Drain and set aside.
Remove from heat; add kale. Using an immersion blender, puree soup while drizzling in remaining 2 tablespoons oil. Return to heat and cook until heated through; add heavy whipping cream and season with salt.

Laura's German Potato Salad
Onto the next item!  Laura's German Style Potato Salad.  German potato style just means it is served warm and typically means there is no mayo.  I broke this rule slightly, which is why it is just German Style, however, there is very little mayo in it.  I don't think I should type a strict recipe for this, because I sort of mixed and matched and I made it over two weeks ago now, so exact measurements are not something I think I can accurately put down unfortunately. 

Basically, I took the fresh market potatoes and peeled them and chopped them rather small, around 1/2 inch pieces.  This is so they are easier to eat, faster to boil and have more surface area to absorb the rest of the ingredients per area of inside potato.  I then put them in salted boiling water and cooked them until they began to get soft, but not super squishy, you don't want them turning into mashed potatoes when you try to stir in the sauce. 

While they are boiling I worked on the sauce, as usual, all my ingredients are organic versions of whatever I'm listing.  It was a small small amount of mayo, some spicy mustard, white wine vinegar.  I whisked that together, once mixed I added extra virgin olive oil until it became a vinaigrette consistency.  I then added freshly chopped parsley and my favorite herb, tarragon, onion powder and a little garlic powder, salt and white pepper.  Stirred that all together then poured it over the cooling drained potatoes.  Stirred it all together, delicious.

Lemon Sausage, fried eggs over potato salad and fried tomatoes
The next day, for breakfast, we had two leftovers!  Lemon sausage was still left, so I fried the remainder of that up, and served the leftover potato salad at the bottom of the plate.  Years ago I realized that if the potato salad doesn't have much mayo and it has herbs, using it under eggs is DELICIOUS and a simple way to get my favorite thing (this time potatoes) into breakfast without any extra work. 

I then took two of our tomatoes left from them market sliced them into quarters and put them in a hot skillet with olive oil.  Fried them until they were soft, added salt and pepper to them.  Put them on top of the potato salad.  I then took my juicy tomato pan and fried some eggs in there.  That is why they look all dirty, they picked up all sorts of delicious leftover tomato juices from the pan.  I put them on top of the tomatoes and potato salad, so that when you break those yolks you get all sorts of yummy all over the lower ingredients.  You may notice that the yolks are a perfect over easy and say, how does this happen.  Here is my secret tip.  Drop the eggs in the pan, then add a tablespoon or so of water to the pan and put a lid on.  The water will evaporate in the pan and this steam will cook the top white over the yolk at the same speed as the bottom of the egg is cooking on the pan.  Works every time.

So that is my market food from a couple weeks ago.  It is not everything we made for food that week, but is almost everything we used from the markets.  As this took me over two weeks to finish, I have since decided that recipe food blogs should be written one at a time!

Friday, June 8, 2012

Johnny Seed Sale

Just a bit of for your information here.  We order a vast majority of our seeds from Johnny's Selected Seeds.  They are a company working hard towards organic seeds, heirloom seeds and seed saving of varieties that are vastly disappearing from our world.  You can see this image to get a bit of an idea of what I am referring too.  It's a bit more than scary really.  Relying too much on one thing, is a dangerous route for food to go, since it is very susceptible to diseases, weather, etc.


Anyway, I digress.  The point of this story is, Johnny seeds is having a sale right now.  http://www.johnnyseeds.com/v-28-sale.aspx?source=E_Liqudiations0612_MainImg&utm_source=Liquidations&utm_medium=Email&utm_campaign=Liquidations0612&lm=jony

Nice time to pick up some fun varieties either still this year or stored away for next year.

Yum.

Monday, June 4, 2012

I hate Cheerios

I hate Cheerios.

That is my statement.  And their new commercial has caused me to want to rant.  Please do not be offended.

I will explain some.  I hate that they use misleading advertising to trick parents and grandparents into thinking Cheerios are designed and perfect for infants and toddlers.  News flash:  They are not.  They are neither made for infants, nor are they good for them.

They are made to make money.  They were invented when Carbs were the answer to weightloss and health problems in the 70s.  Now they are an "American" breakfast staple.  They are not the answer to breakfast though.

Next: they are not good for infants.  This is why.  Babies under a year should not have any salt added to their food, as this can strain immature kidneys and cause dehydration (this is also why fast food and preprocessed foods are bad for infants).  A preference for salt often becomes established at an early age, and eating too much salt may lead to high blood pressure later in life.  Babies up to six months old should have less than 1g of salt (less than a 1/4 tsp) a day and from seven months old to hopefully around 18 months they should have a maximum of 1g a day.  This is why you should not give your baby foods that have not been made specifically for babies.

Cheerios contain loads of sodium, or as we all know, SALT.  On their box they list the serving size for children under 4 as 3/4 cup.  This size contains 120 mg of sodium, which translates to 1.2 g.  News flash again:  This is more than their entire daily intake should be if they are over seven months old.  If they are under seven months, its probably double their daily intake.  This is PREPOSTEROUS!  Not to mention the sugar, modified corn starch, Genetically modified grains used and chemicals for freshness.

Just don't do it.  Don't believe any advertising EVER.  Advertising is designed to make you want things without thinking.  I know, I create advertising and teach people how, though I have morals about what I will advertise and how.  I teach people about these morals and deciding their own.  If you see an ad, realize they are selling you something and check it out yourself first.  Just cause everyone else is doing it, doesn't mean its cool or safe.  And please don't feed your infants Cheerios, it makes me sad inside for the generations growing up with more and more health issues, because we're uninformed or budget crazy and can't buy them infant puffs with no salt or sugar added.

Baby Quail

The baby quail are now almost a month old.  They have at least doubled in size, which still means they are barely the size of a baby chick.  However, their wings are huge and their legs are long.  They run super fast and fly like a powered rocket.

We started with 57 babies (chicks or cheepers).  13 died within the first day.  I know this sounds harsh and it is definitely higher than our normal mortality rate with chicks, geese and turkeys, but we have never raised quail before and as usual, many die when it takes over two days to come to us, in a box, with no food or water.  They also are very tiny, so I feel perhaps they are slightly more fragile in travel than the other poultry we've raised.

I counted yesterday when Thomas discovered one on the top of their cage, the outside top.  We then chased it throughout the garage and under the ramp in our garage and between pieces of vertically staked plywood.  There are now I believe, 39.  So apparently, we have lost 5 to flying out the window or into the garage and out the garage door when we open it for the day and we just didn't notice.  Lesson learned, quail need a screen on top, not chicken wire or the small gauge stuff we have been using.

Today I got carefully got one out to show the neighbors.  I thought I had a good hold on it.  Turns out, I did not.  It flew out of my hands and all the way across the garage into one of Thomas' tool boxes in one feel swoop.  It is astounding how something SO SO small can fly so incredibly high and well.

We are learning a lot.

Tuesday, May 29, 2012

Fabric Design Decisions

This morning I worked on finishing up some designs for an upcoming Spoonflower design competition.  They hold them weekly, each week a different subject/parameter.  I always want to enter, but until now, have only ever been able to finish one design for entry.  I have worked on three different competitions, but time and power outtages have thwarted my other BRILLIANT ;) entries.

The parameters of the one I am working on has a color restricted palette (RGB #a7bb7d and #724b64) and must use geometric shapes.  I started a very basic design and then sort of built it from there, unable to stop myself, since the design is for myself.  Therefore, I have decided to post all of them here and have you all let me know your thoughts on which one I should use for the entry, as you can only enter one design in each weeks competition.

First, a close up of what the dots look like:


Now the different designs, I could have done more on the white background, but I don't seem to like those as much, so I didn't.  Obviously, all these patterns will repeat over and over on the fabric.


Polka Green

Polka Purple

Polka Green with Purple Detail
Polka Purple with Green Detail
Polka Green with White & Purple Detail

Polka Purple with White & Green Detail


Polka White with Green Dots

Polka White with Purple Dots 


Thanks for looking!

Monday, May 28, 2012

Stupid Cute Baby Chicks

Baby chicks in the corner (day after rain)
So our new baby rare chickens are stupid.  Yesterday we had a huge thunderstorm all morning.  These chicks (2 white sultans, 3 blue laced red wyandottes, 3 white cochins, 2 german spitzhaubens) just got moved outside last week as they are just finally around six weeks old.  Because all of the Rainbow Rangers (or Fat Fats as we call them) we are raising for meat haven't been slaughtered yet, the area for them isn't empty yet.  But because they were getting so big we decided to put them with the fat fats rather than keep them inside, all the fat fats left are females and they are pretty slow, so we figured they wouldn't give them too much trouble.

White Sultan - six weeks oldish
So back to the chicks, rather than stay inside their hut during the storm of torrential downpours, they choose to stay outside huddled in a front corner of the run, right at the edge (a dangerous place as predators could try to reach in and get them).  SOAKING wet chicks.  Try as I might to move them into the hut, they just came running back out to the corner in the rain.  I moved a large trashcan in the area near the corner to give them protection near where they apparently wanted to be, but no.  They ran right out of that again to the corner.  Finally, I just gave up and decided if they wanted to be wet, they were going to be.

Apparently, the shower was worth it, cause today, I went down to check on them early in the morning and they are CUTER than ever because of the wash.  Especially the white sultans.  ADORABLE. .. even if they are stupid.
Left to right: German Spitzhauben, Blue Laced Red Wyandotte, White Sultan - all six weeks oldish

The baby chicks crowding each other for no reason.

Pesto Tomato Frittata

Today I awoke to a wondrous thunderstorm and it stayed super rainy and stormy all morning.  So dark in fact, that if felt like night and a most productive night indeed.  Because of the extreme lightning we had all the computers unplugged and tvs off and had to do things in the house!  Oh My!

Frittata before cooked
Started with laundry and actually read some of my magazines, which was thrilling, as that rarely happens.  In doing so, found my recipe for breakfast:  Pesto Tomato Frittata.  Wasn't too sure on it, because I am not known for being the biggest fan of pesto, I want to love it, and try again and again to love it, but I just never do, just too strong or something, can't really describe it.  However, I was tempted by the thought of green eggs and the beautiful tomatoes from the market.  Plus, we still had the mozzarella leftover from last weeks market and pesto in the freezer from last summer.  So I showed Thomas, asked his opinion, saw his look of doubt and plowed forward.

Used hamburg and sicilian buttercup eggs for this, meaning they were small white ones that are fairly rich in flavor, because those chickens don't lay everyday.  Followed the recipe, except instead of mozz on top, I used cheddar cheese curds cause I didn't have any extra mozz and I cooked bacon first and used some of that leftover fat for the pan, rather than all just olive oil as the recipe says.  It was so good I didn't know pesto could be so good.  Definitely a "keeper" recipe.  Truly delicious, highly recommend.

Frittata after cooked
Recipe as I followed:

6 small eggs
1/4 cup basil pesto
coarse salt & pepper
1/2 cup mozzarella
1 tsp olive oil
1 large tomato, thinly sliced
bacon fat
handful of cheese curds

Preheat oven to 425. In a large bowl beat eggs with pesto, 3/4 tsp salt, 1/4 tsp fresh ground white pepper, 3/4 mozzarella.  In a large nonstick skillet (we have a massive one), heat oil and bacon fat over medium-high.  Add egg mixture and cook, stirring slightly, 1-2 minutes.  Arrange tomatoes in a single layer on top and sprinkle with cheese curds.

Bake until puffed and center is just set, 10-12 minutes (our oven took like 9 minutes).  Let sit 5 minutes, cut into wedges and serve!  (with bacon, yum yum)

On my plate with bacon, yum.


Saturday, May 26, 2012

Springtime Farmers Markets

Arya and Thomas at the Sara Hardy Market - May 26, 2012

Sara Hardy Farmer's Market
One of my very very favorite things to do is go to farmer's markets.  I do not say this lightly.  ONE of my VERY FAVORITE things.  

Here in my area, we have a TON.  We have the indoor Mercato market throughout the winter in Traverse City on Saturdays.  We have the spring/summer/fall Sara Hardy Market in Traverse City on Saturdays (the big one).  We have the Suttons Bay Market on Saturdays in SB.  We have the Northport Market on Fridays in Northport, we have the TC market on Wednesday.  And if you were so inclined, even more throughout the area, but I just don't even have the time to make it to them and put up the food I would buy (whimper whimper).

But I am not just obsessed locally, on vacation too.  If we are traveling somewhere, I always research where the farmers markets are there and when, so we can plan our days around them. Cause, there is nothing more fun than exploring new produce and foods that you didn't know existed and there is no faster way to learn about a place and its culture than going to a market and meeting all the people and seeing what they eat.  Plus you can bring home some real treasures of tastiness and memories hold tight better when you use more senses to remember them.  Mmmmmm.

Isadore Farms at the Sara Hardy Market (one of our many friends)
Thomas and Arya at Sara Hardy Farmer's Market - May 26, 2012
Now I am positive doing all this is not because I am weird....it is because markets are amazing.  Every week, you get the rush and excitement of not knowing what new and exciting things you will find.  Every week you anticipate the coming of each vegetables seasons: ramps, radishes, then asparagus, strawberries, peas, cherries, corn, tomatoes, peaches, pumpkins, on and on and on.  The anticipation never ends.  

Super asparagus season at the markets
In addition, you only need a little to get a lot.  Save $50 of your weekly grocery budget to take to market and you will be able to buy bags and bags of produce and goodies.  Save a $100 and you're going to end up with more than you can use in a week, so you can can, freeze or dry some!  It's just awesome.  It's a shopping spree buzz, that you can't feel guilty about, because its food for your goodness.  PLUS, PLUS you're getting to give money to your farmer directly, this is one, why it's cheaper, but two, even selling cheaper they're making way more money selling it directly to you, than if they sold it to a store and you bought it, so DOUBLE WIN!  AND EVEN MORE, many farmer's at the markets are completely organic, but no organic prices, super triple quadrupedal awesomeness!  Oh, and the final bit of awesomeness, okay, maybe not the final bit, but yet another, you get to make new friends and meet the people passionate about the things you're buying from them.  Want to know how it was grown, they know; want to know how to cook it, they know; want to know when it was picked, they know; want to know long it will be in season, they know; want to know what else you could try like it, they know.  I think you get the idea and because they are so passionate and so knowledgeable, they are pretty much  the coolest people you've ever talked to and you just can't wait till next week to talk to them again.


Second Spring Farm - super awesome organics, great lettuce - interesting sidenote, Reid & Allie run this here place and Allie also was one of the midwife assistants who helped bring Arya into the world!

Pretty fogging view driving in to TC to markets this morning
Grand Traverse Bay on the way to markets this morning
So now that I have sucked you into my delicious excitement over markets, I figured I'd share my awesome scores from this morning.  I always wake up super early to get to the markets right when they open, so no one's sold out yet.  You may think this is funny and unlikely, but its not.  This is not a store, if they run out, there is no back room, they're out.  And you would probably be surprised how busy it is, even if you get there right when it starts.  Hopefully, my awesome market bragging will get you out of bed next market and share in some excitement of your own, maybe not at the crack of dawn like me, but at least checking it out! 

This week I spent $80 bucks at the markets: Sara Hardy in TC and Suttons Bay Market.  As you may see from the large amount of fresh local organic food I picked up, I think this is a steal of a deal.  Plus, as far as I'm concerned, this money goes towards my entertainment as well.  This is no grocery store errand, this is fun!


Arya admiring her momma's amazing market selections this week
I bought 15 pounds of asparagus total from two different farms that we like.  You may think this is absurb, but its not.  We love asparagus.  We are now at a point in our organic lifestyles that we really only buy food if it is in season, for multiple reasons, which I can go into some other time, but money is a definite factor.  This means we have an extremely short window to buy asparagus in.  During this time, I flash boil and freeze massive quantities so that we can have it the rest of the year.  Last year, I bought probably at least 70 pounds over the asparagus season, we ran out 2 months before asparagus was back in season.  To me, that's just totally unacceptable : )  So this year I need to buy more and store more, plus, this year, we have Arya who LOVES pureed asparagus, so a whole lot of it is already been used, by making her food and freezing that!

Goodies from the Market
Bought three tomatoes, in season already, because the farm it was from has a hoop house and was a farm that was further south that came UP to our market.  

Bought a large bunch of catnip, it was only a dollar and I figured the cats would love me.  I was right, hadn't even finished unloading all the bags and Simone (my smallest older cat) was already mauling the bag it was sticking out of.

Bought a bunch of awesome looking red beets with greens.  Double punch of goodness, greens and beets.

Bought a bunch of fennel bulbs.  Excited to make some macaroni salad or something this week to utilize that tasty treat.

Two bunches of regular radishes with greens & one bunch of french breakfast, which basically means they are mild and look like fingers.  Double punch again, greens and radish.

My take this week
Thomas was very pleased when he arrived to market and saw that finally his favorite Omish bakers have started coming again.  (the last two weeks they have not been at the market yet)  So he purchased his ritual brownies.  You ask why does he buy brownies, when I make him brownies all the time?  Apparently you have not had these brownies.

Two celariac roots.  These are basically the root of a celery plant, for those left wondering.

Arya enjoying a fresh sprig of asparagus
A loaf of what I call, popcorn elephant ear bread from Pattiserie Amie.  I don't know what it is really called, but my name is descriptive.  It tastes like, an elephant ear, but at the same time fresh buttered popcorn, so in other words, delicious.

A fresh salad mix, of various baby greens and nastursiums.

And finally, numerous seedlings.  This week I got more thyme for the rock garden, parsley, cilantro, dill, an eggplant to go with my others, okra and some weird fancy sumerian pepper plant or some such thing.  It's leaves were purple and it has a fun name, I was intrigued, we will see where it leads us this summer.

So there we have it, I think.  What will I do with it?  Whatever I want, bwhwhahaha.  No really, some I will store, namely the asparagus, much else we will eat this week.  Radishes may get roasted, greens braised, celeriac root will likely become soup, catnip is for the cats, but perhaps I will also explore a catnip tea for the first time as the farmer recommended we try it that way, fennel is probably going to be a macaroni or potato salad as I am craving it, tomatoes, unsure, in a salad or fried with eggs for breakfast probably.  As I progress through using all these goodies, I will try to keep you updated!

I hope I have inspired you a little bit, to head to your nearest market this coming week!  YUM.


Thursday, May 24, 2012

Long Time No Blog

Hello All,

I can't even believe it, but apparently I haven't written anything in this here blog for a whopping three years.  How the time flies.  Due to this significant lapse in time and some recent thought about what this blog is for, I have decided a reintroduction and re-purpose of this blog idea is needed.

So here goes.  My name is Laura Cavendish, self-proclaimed Lady Cavendish.  I am the wife of Thomas Cavendish, legal alien from Bury St. Edmunds, Suffolk, England, born in Great Yarmouth, England.  Last year on September 13th, I became the mother of our first daughter, Arya Althea Cavendish with a planned home birth.  

With my husband, I am the owner, marketing director, designer, customer service representative, scheduler, organizer, accountant and construction assistant for Lord & Lady Construction LLC.  Trying to help others with building projects by giving them quality we stand behind with materials and ideas that can help the planet and ourselves as much as possible.

I also am an adjunct professor at Northwestern Michigan College in Traverse City, Michigan.  I teach a multitude of classes, varying by semester, but consist of Digital Graphics Design 1 (learning Illustrator and InDesign), Interactive Animation 1 & 2 (learning the beginnings of Flash, Fireworks & Soundtrack) & Time Base Media 1 & 2 (learning the beginnings of Final Cut Pro & filming basics).  I teach these classes in the fall and spring semesters, finally halting my summer semester teachings for the first time this summer, deciding to give myself the extra time necessary to be with Arya, the kitchen and the gardens and animals that I so enjoy. 
 
I am also the marketing director and designer for All Eyes PC, a private optometry practice in St. Joseph, Michigan, run by my father, Dr. Robert Reed Jr, OD and my mother Mae Thomas Reed.  I help them with brainstorming and developing design ideas and create and complete all of their design work, from start to finish with the printers.

Finally, I operate an online shop at etsy.com, selling my sewing, painting and tasty treat creations with my younger sister, Paula, at www.LadyCavendish.Etsy.com.  Right now it is in desperate need of some new products to sell, but I'm still piled underneath work from all my other jobs to get anything caught up there.

In conjunction with all of those jobs, I am an explorer of the organic lifestyle.  With my family working every day to become closer with our ancestors way of life, knowing where our food comes from, sustaining ourselves and protecting our world for ourselves to live in.  Growing food, making choices, raising animals, doing what I can now, planning for more in the future.

I would not describe myself as some crazy hippie or organic purist.  I am just a normal person, who grew up in the city eating frozen food and Burger King, who moved up north and has slowly become this unknown organic farmer from within.  None of this happened overnight and every day I learn something new that I want to try doing.  My philosophy has always been that our goal should always be to change a little every day for the better.  If you try to do it all at once it becomes too overwhelming and expensive.  I always say, pick one thing, do it till its normal and then pick something else.  Before you know it, its been six years and you have no trash, drink no coffee, eat no fast food, eat all organic and local foods, only when they're in season and you're raising hundreds of animals for meat!  Okay, so maybe not before you know it, but before I knew it, it happened.

So there is me, in very short summary.  I am the writer of this blog for Lord & Lady Construction.  Originally I set this up, intending to have it as a source where we could post new exciting eco-building news and information, as well as some general green and eco-news and information.  Recently, people have been asking if I am keeping a journal or blog of all the goings on here and all the fun, exciting, green developments and projects that we work on and are a part of.  Other than posting short blips on facebook and taking hundreds upon thousands of photos, the answer is essentially no.  I don't particularly feel that my case is very unusual or unique - city girl gone country.  But then I drive by Sams Club, a store I have only set foot in once (because I was forced to go with family, then proceeded to have a reverse claustrophobia attack, which is another story/rant entirely) I see the drones plodding in and out with carts overflowing with toxic goos reminiscent of the movie, Idiocracy, and I wonder, maybe I am very different in my lifestyle choices and opinions.  

I don't know that I can help anyone and I don't know if I can open anyone's eyes and I am by no means an expert on any of the aspects I deal with, but I try and I strive to learn & improve everyday.  And after some encouragement from friends, I have decided that perhaps with this blog, I can start to share some of our experiences across the entire spectrum of our lives, not just with building green, but with everything we do.  If it will help just one person, realize one change in their lives for the better, that would make me very happy.  If this sounds like something you'd be interested in following along with, I look forward to sharing with you.

Thanks,
Laura